Friday, August 08, 2014

Molly's blueberry pie

Well hello.  It's been a while.  A million things have come before this blog and it's been longer than it should since I posted.  A recent shoot with stylist Molly Shuster for Eat Boutique inspired me to get back to posting, and share her delicious take on blueberry pie. 

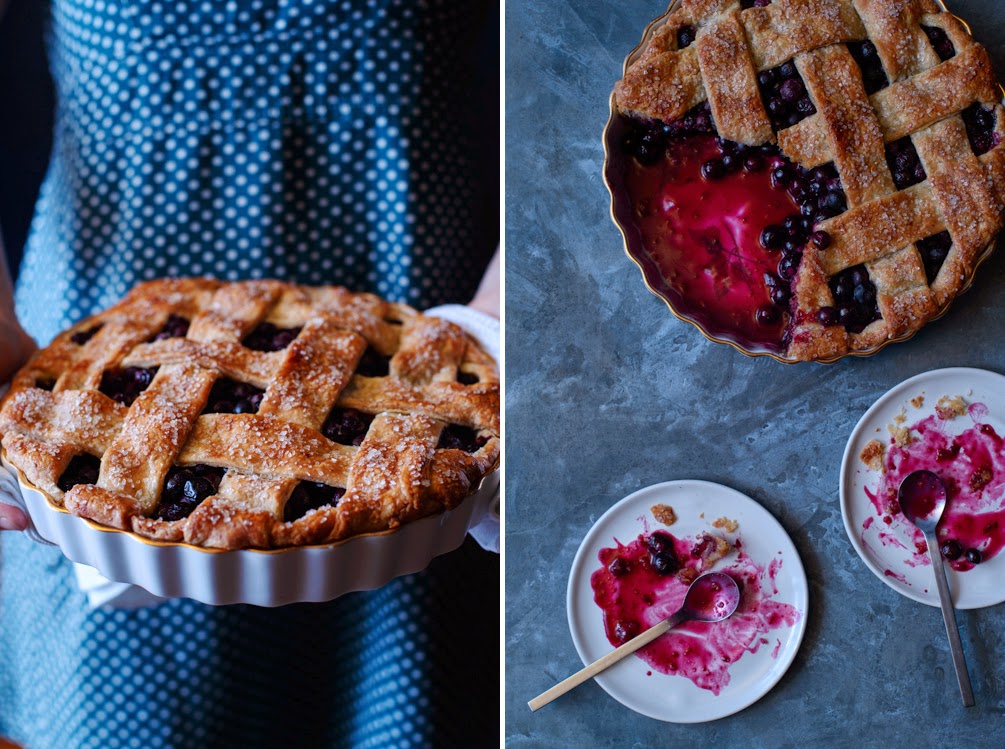
That and juicy, in-season berries, a blue state of mind, and some fun prep, in process and post shots we took.  

We shot her recipe, then we couldn't help but fiddle, style, re-style and shoot.  The traditional pie was our jumping off point, and the other, our indulgence. Which do you like?  Same set and ingredient.  Two very different looks.  The pretty pie plate was the jumping off point for the second version.

We shot these slightly ahead of blueberry season in the north east and before our own bushes have turned.  Looking back at these makes me look forward to harvesting our own.  There will definitely be more blueberry pies, tarts, and tartelettes this season.

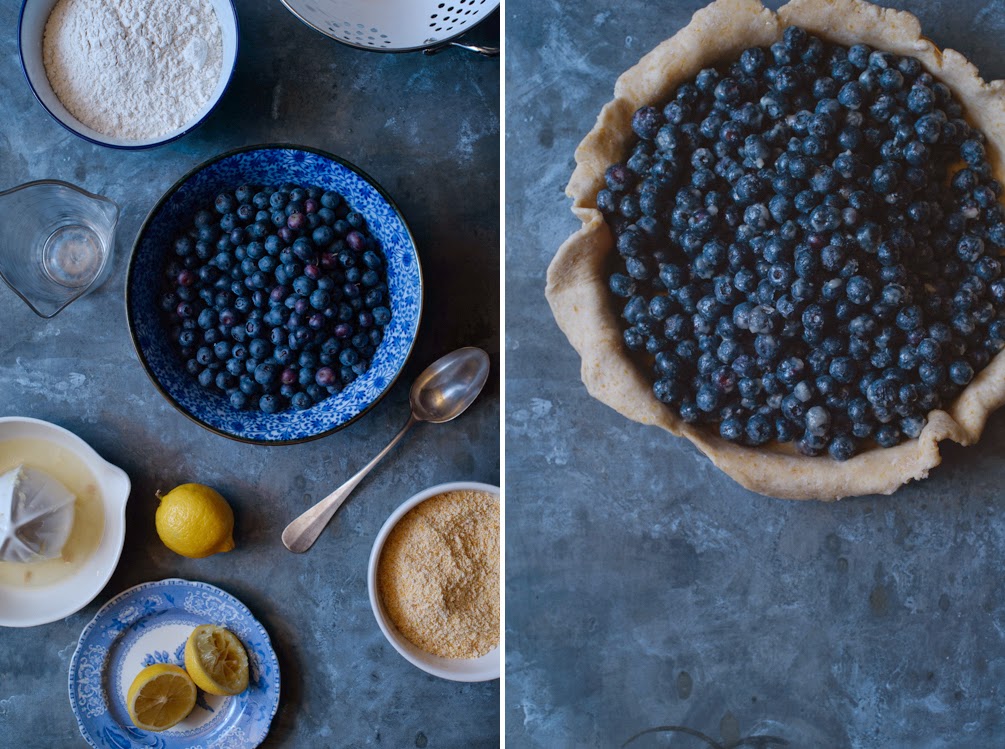
Molly's blueberry pie with cornmeal crust (pictured above)

Ingredients:

Cornmeal Crust:
2 cups flour
1/2 cup cornmeal (I love Gray’s Grist Mill brand)
1 tablespoon sugar
1/2 teaspoon salt
2 sticks cold butter, cut into pieces
Ice water, as needed
Cream, for brushing
Sanding or turbinado sugar, for sprinkling

Blueberry Filling:
3 pints blueberries
1 lemon, zest and juice
1/3 cup sugar
3 tablespoons flour
  1. Place the flour, cornmeal, salt and sugar in the bowl of a food processor and pulse to combine. Add the butter and pulse a few times until the butter has started to incorporate but small pieces of butter remain. Adding ice water 2 tablespoons at a time, pulse until the mixture resembles wet sand. Pour onto a work surface and shape into a disc (knead a bit of the dough if is a little too crumbly to shape together.) Cut the disc in half and shape each half into a disc. Wrap with plastic wrap and place in the refrigerator to chill, at least 1 hour or overnight.
  2. Place a baking sheet in the oven and preheat to 400º. On a lightly floured surface, roll out one of the discs of dough until it is about 11” in diameter. Line a 9” tart or pie plate and prick the bottom of the dough with a fork. Place in the refrigerator to chill.
  3. Meanwhile, make your filling. Combine all of the ingredients and gently toss to combine.
  4. Roll out the remaining dough until it is about 1/8” thick. Cut into 1 1/2” wide strands. Pour the blueberry mixture into the pie plate and braid the strands decoratively on top. Tuck in edges and pinch together to make a crust. Brush with cream and sprinkle generously with sugar.
  5. Place on the baking sheet and bake for 10 minutes, then reduce the heat to 350º. Bake for another 30-35 minutes, or until the berries have begun to burst and the crust is nicely golden-brown.
  6. Let cool at least 20 minutes before serving.

For more of Molly's recipes, hop on over to her blog.

Monday, September 02, 2013

End of summer treat: basil pesto


Where did summer go? Well, I do know where some of it went - much of it was consumed by a constant routine of doctor's appointments in preparation for the arrival of a new child - now imminently on the horizon. Summer has both gone quickly as I've tried to pack in as much as possible before the new arrival, and in some ways slowly as I've been physically slow and limited. We've stayed close to home on the weekends, enjoyed guests, cooked in and enjoyed just hanging out together.


To make things easier, we signed up for a new food subscription service that brings carefully selected farmer's market produce and thoughtful, simple recipes to your door.  It helped keep my appreciation of fresh produce and interesting artisanal ingredients alive even when the thought of hauling produce back from the farmer's market was impossible or the challenge of exploring a new recipe seemingly insurmountable.  Between that, our garden and the farm markets upstate, we've had direct-from-farm ingredients all summer including a constant supply of fresh eggs and wonderful milk.  I bought a beautiful, light, handmade basket to transport vegetables from our own garden as a special treat and an incentive to stand out in the heat.  Lately the tomatoes and raspberries in particular have been ready for harvest by the boat-load - we've enjoyed picking and trying to eat them as fast as they appear.


This weekend I realized I had almost forgotten the pleasure of harvesting the big, bushy basil that is almost waist-high at this point.  We brought in a basketful of leaves and then enjoyed processing several batches of pesto - some of which I'll freeze so we can enjoy it longer.  Last summer's frozen bounty was destroyed by the days without electricity during the hurricane.  Maybe we'll make a point to consume it faster this year so we don't expose ourselves again to that risk.


Homemade pesto

4 cups firmly packed basil leaves, washed and dried
1/4 cup pine nuts, lightly toasted in a dry skillet until golden brown
1/4-1/2 cup grated parmesan cheese
2 cloves garlic
Juice from 1/2 lemon to maintain bright green color of the basil
Olive oil to taste/desired consistency
Sea salt and freshly ground black pepper

In a food processor, pulse garlic until minced.  Add basil leaves, a several generous pinches of salt and pepper, and pulse until roughly chopped.  Add pine nuts and pulse ~5 times until nuts are roughly chopped.  Add cheese.  While food processor is running, continuously stream olive oil through the food chute until a homogenous paste is formed.  Process less for a chunkier pesto or more for a finer pesto.  Squeeze lemon juice over pesto and pulse a few times to combine.  Adjust seasonings to taste. 

Sunday, August 18, 2013

Homemade hummus and Vegetable Literacy


I have needed to eat extra protein this summer for health reasons and steak is sure getting a bit old.  Among my favorite non-meat sources is chickpeas, as you might gather from this post and the last.  I'm enjoying them in all sorts of forms - the secret, as mentioned in the previous post, is to avoid canned chickpeas and use dried ones for better control over texture and flavor.

I'm refreshing my cookbook collection and have lately picked up books on canning and cooking vegetables to help me make best use of the garden harvest.  Deborah Madison's new book, Vegetable Literacy, grabbed me right away with its simple, graphic-organic cover and thick, glossy pages full of interesting vegetarian recipes.  It's such a pretty book that I've already gifted one.  One recipe that caught my attention right away is for hummus.  It's true, there's not much variation and originality in hummus recipes but perhaps something about the way it was photographed or the simplicity of the preparation caught my attention and I made note to buy tahini and make a batch.


In country, where we spend weekends, specialty food stores are far and few between.  The large supermarket had a tahini whose "sell by" date was one day after we purchased it.  Perhaps it was meant to be?

Hummus (adapted from Vegetable Literacy by Deborah Madison)
(makes 3 cups)

1 cup dried chickpeas, cooked and drained, some cooking liquid reserved
Juice of 2 lemons
1/3 to 1/2 cup tahini
3 cloves garlic, pounded in a mortar with several pinches of salt (Spoonful note: Next time I'll try roasting a head of garlic and using that instead)
Sea salt

Finishing touches

Sumac or paprika
Olive oil
Reserved whole chickpeas
Chopped parsley
Toasted pine nuts
Pita or other bread, for serving

Puree chickpeas and lemon juice in a blender or food processor, slowly adding enough cooking liquid to create a creamy consistency.  Add tahini and garlic and process to combine.  Add salt to taste and adjust salt and lemon juice as necessary.

Turn hummus out onto a plate or into a wide-rim bowl.  Make tracks in the chickpeas with a knife to create wells for olive oil to pool into.  Garnish with olive oil, and additional finishing touches as desired.

Friday, July 12, 2013

Summer salads, part 1


Summer finally feels like it's here in force. All the early summer rain ruined the snap peas in the garden and killed the peonies I'd been looking forward to all year before they even had a chance to bloom.  But then the English peas started arriving and along with them, early lettuce, kale and garlic -  and summer dining kicked off.

My favorite salads have lots of texture and a zippy dressing.  Washing and drying lettuce is tiresome: I love to use other ingredients to avoid the work of preparing lettuce and vary the menu.  Lately I've been loving chickpeas in salads.  The secret is to avoid the slightly slimy overly plump canned variety and start with dried, soaking overnight and then simmering until just tender so they are still a bit firm.  Seasoned well, they have wonderful flavor and great texture.  They also add easy protein to the salad.

A salad I've been enjoying lately is is a pea/bean combo of chickpeas, English peas and fava beans.  The latter is a bear to prepare but done in stages, the prep is not so bad and the reward is great.  Dressed with a simple garlic/vinegar/olive oil dressing, plenty of sea salt and fresh black pepper, the salad is terrific, and keeps well even when dressed.  Some nice additions: a handful of baby lettuces, a mollet egg to turn it into a hearty standalone lunch, some chopped shallot, a shaving of pecorino, a sprinkling of fresh herbs (Italian parsley and chive are my favorites).  After a week of this salad, I keep thinking I'll tire of it, but I haven't yet.

Pea/bean salad

Salad

2-3 cups dried chickpeas, soaked overnight then simmered until just tender
1 cup English peas, blanched then shocked in ice water
As many fava beans as you care to prepare
Handful baby lettuces such as baby romaine
Sea salt and freshly ground black pepper
Additions as noted above, if desired including egg(s)

Dressing

1 clove garlic, finely minced
1/4 cup extra virgin olive oil
1/3 cup sherry vinegar

Prepare fava beans: remove beans from pods and boil in salted water for 60 seconds.  Shock ice water.  Remove beans from waxy outer cover by piercing cover with your thumbnail and squeezing bean out.  Combine fava beans, English peas and chickpeas.  Combine dressing ingredients and dress pea/bean mixture as desired.  Season generously with salt and pepper.  Taste and adjust seasoning.  Gently mix in lettuce.  Sprinkle with herbs or cheese shavings if using (and/or top with mollet egg).